
Real-ESRGANのモデルに対し追加学習(ファインチューニング)することで、特定の画像に特化したモデルを作成することが出来るとのことですので試してみたいと思います。

Real-ESRGANのインストール
環境:
Ubuntu22.04がインストールされたPC
CPU:AMD Ryzen 5 7600 6-Core Processor
GPU:GeForce RTX 3060 (VRAM 12GB)
WSL-Ubuntuでも良いですが、学習でメインPCが占有される可能性が高いので専用PCを用意する。
git clone https://github.com/xinntao/Real-ESRGAN.git
cd Real-ESRGAN
mkdir venv
python -m venv venv
source venv/bin/activate
pip install basicsr
pip install facexlib
pip install gfpgan
pip install -r requirements.txt
python setup.py develop
deactivate
データセットの準備
高解像度画像をdatasets/DF2K/DIV2K_train_HR_subディレクトリにセット
低解像度画像をdatasets/DF2K/DIV2K_train_LR_bicubic_X4_subディレクトリにセット
generate_meta_info_pairdata.pyで設定ファイル生成
python scripts/generate_meta_info_pairdata.py --input datasets/DF2K/DIV2K_train_HR_sub datasets/DF2K/DIV2K_train_LR_bicubic_X4_sub --meta_info datasets/DF2K/meta_info/meta_info_DIV2K_sub_pair.txt設定ファイルの出力先datasets/DF2K/meta_info/meta_info_DIV2K_sub_pair.txt
トレーニングデータのダウンロード
wget https://github.com/xinntao/Real-ESRGAN/releases/download/v0.1.0/RealESRGAN_x4plus.pth -P experiments/pretrained_modelswget https://github.com/xinntao/Real-ESRGAN/releases/download/v0.2.2.3/RealESRGAN_x4plus_netD.pth -P experiments/pretrained_models-Pがダウンロード先のディレクトリですのでexperiments/pretrained_modelsにダウンロードされる。
設定ファイルの変更
options/finetune_realesrgan_x4plus_pairdata.yml をディレクトリに合わせて変更
train:
    name: DIV2K
    type: RealESRGANPairedDataset
    dataroot_gt: datasets/DF2K  # modify to the root path of your folder
    dataroot_lq: datasets/DF2K  # modify to the root path of your folder
    meta_info: datasets/DF2K/meta_info/meta_info_DIV2K_sub_pair.txt  # modify to your own generate meta info txt
    io_backend:
type: diskdataroot_gtが高解像度データセットを保存するディレクトリのルートdatasets/DF2K
dataroot_lqが低解像度データセットを保存するディレクトリのルートdatasets/DF2K
となっていますが、環境に合わせて変更しなさいとコメントがあるので要確認
meta_infoがdatasets/DF2K/meta_info/meta_info_DIV2K_sub_pair.txt先ほど生成したファイルのパスを指定するようです。
pretrain_network_g: experiments/pretrained_models/RealESRNet_x4plus.pth
を
pretrain_network_g: experiments/pretrained_models/RealESRGAN_x4plus.pth
へ変更

ソースコードの修正
実行すると
ModuleNotFoundError: No module named 'torchvision.transforms.functional_tensor'が発生
エラーメッセージが発生したdegradations.pyをテキストエディタで
from torchvision.transforms.functional_tensor import rgb_to_grayscaleから
from torchvision.transforms.functional import rgb_to_grayscaleに変更
ファインチューンの実行
python realesrgan/train.py -opt options/finetune_realesrgan_x4plus_pairdata.yml --auto_resume-optにoptions/finetune_realesrgan_x4plus_pairdata.ymlのパスがセットされています。
–auto_resumeオプションは字ずらからすると自動的に前回の続きから実行してくれるように見える。
用意した画像
高解像度は256×256サイズ、低解像度は64×64サイズと4倍に拡大することを想定してみました。
どうやって、データセットを用意するのかが問題です。
学習したモデルで拡大処理を実行
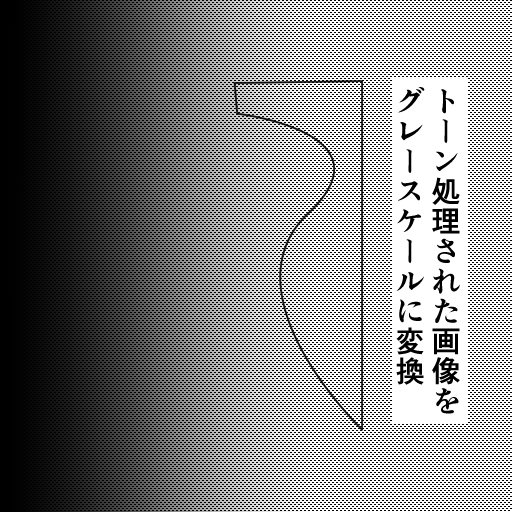
python inference_realesrgan.py -n RealESRGAN_x4plus -i inputs --outscale 4 --model_path experiments/finetune_RealESRGANx4plus_400k_pairdata/models/net_g_latest.pthトーン処理された画像とグレースケールの画像を学習させたモデルを使うと以下のような結果になりました。
トーン処理された元画像
学習したモデルで拡大処理⇒GIMPで元画像と同じサイズに縮小
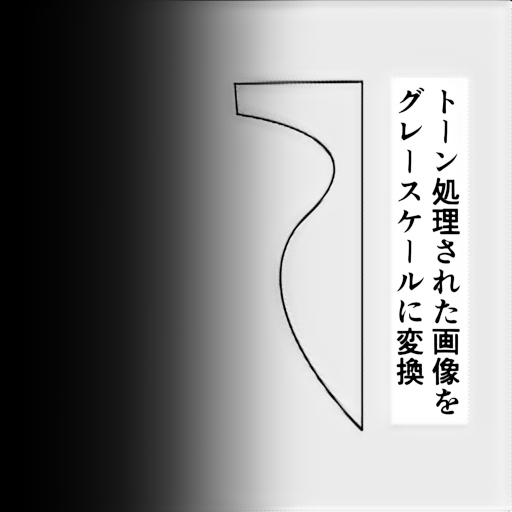
超解像による拡大することが本来の機能ですが、トーンの除去に使えないかと思い試してみました。
Google Colabでファインチューニング
ローカル環境では処理能力不足で学習時間が長時間になりがちなのでColabでもファインチューニングする環境を構築してみました。
2025/03/19日現在、上記と同じ手順で行うとColabでもエラーメッセージが表示されて詰まります。
ただ、Colabの場合上記のソースコードの変更が出来ないのでインストールするパッケージのバージョンを古い物にすることで対応します。
!pip install basicsr
!pip install facexlib
!pip install gfpgan
!pip install torch==2.0.1 torchvision==0.15.2 --extra-index-url https://download.pytorch.org/whl/cu118
!pip install numpy==1.26.4
!pip install -r requirements.txt
!python setup.py develop
requirements.txtは以下のように書き換えておく
basicsr>=1.4.2
facexlib>=0.2.5
gfpgan>=1.3.5
#numpy
opencv-python
Pillow
#torch>=1.7
#torchvision
tqdm
Colabはセッション時間が決められており、長時間の学習には向かないと思いますが、Real-ESRGANはauto_resumeオプションで前回の続きから実行することが出来ます。
Colabではきちんとレジュームされるか確認できていませんが、ローカル環境では機能していました。(数日に分けて実行しました。)
最後に時間経過でpipなどでインストールするパッケージのバージョンは上がるので、この手順でも実行できない日が来るでしょう。
Real-ESRGANのソースコードを新しいパッケージバージョンに合わせて修正が出来ればよいのですが、そうでなければローカル環境で実行環境を仮想化してバージョンを固定するしかないのかもしれません。
ファインチューニング再始動
20251023
グラボを入手したので再開。
学習画像の明るさを調整し、トーン→グレイ変換に特化するため、アップスケールは無し等倍4倍にアップスケールで学習。
・画像のタイル分割
import cv2
import numpy as np
import os
from pathlib import Path

# Real-ESRGANのファインチューニング用学習データセット作成


gray_indir = 'X:/dataset/gray/'
gray_outdir = 'X:/dataset/gray_tiles/'
os.makedirs(gray_outdir, exist_ok=True)

# トリミングサイズ
gray_tile_h, gray_tile_w = 256, 256
count = 1
for filename in os.listdir(gray_indir):
    img = cv2.imread(os.path.join(gray_indir, filename), 0)
    h, w = img.shape[:2]
    count = 0
    print(f"{filename} - size: {w}x{h}")
    for y in range(0, h - gray_tile_h + 1, gray_tile_h):
        for x in range(0, w - gray_tile_w + 1, gray_tile_w):
            print(f"{y}, {y+gray_tile_h}, {x}, {x+gray_tile_h}")
            tile = img[y:y+gray_tile_h, x:x+gray_tile_w]
            out_filename = f"{filename}-{count}.png"
            cv2.imwrite(os.path.join(gray_outdir, out_filename), tile)
            count += 1

tone_indir = 'X:/dataset/tone/'
tone_outdir = 'X:/dataset/tone_tiles/'
os.makedirs(tone_outdir, exist_ok=True)

# トリミングサイズ
tile_h, tile_w = 64, 64
count = 1
for filename in os.listdir(tone_indir):
    img = cv2.imread(os.path.join(tone_indir, filename), 0)
    h, w = img.shape[:2]
    count = 0
    print(f"{filename} - size: {w}x{h}")
    for y in range(0, h - tile_h + 1, tile_h):
        for x in range(0, w - tile_w + 1, tile_w):
            print(f"{y}, {y+tile_h}, {x}, {x+tile_w}")
            tile = img[y:y+tile_h, x:x+tile_w]
            out_filename = f"{filename}-{count}.png"
            cv2.imwrite(os.path.join(tone_outdir, out_filename), tile)
            count += 1
・4倍、トーン→グレイ、RTX3090向け、学習オプション
# general settings
name: finetune_RealESRGANx4plus_400k_pairdata
model_type: RealESRGANModel
scale: 4
num_gpu: auto
manual_seed: 0

# USM the ground-truth
l1_gt_usm: True
percep_gt_usm: True
gan_gt_usm: False

high_order_degradation: False # do not use the high-order degradation generation process

# dataset and data loader settings
datasets:
  train:
    name: DIV2K
    type: RealESRGANPairedDataset
    dataroot_gt: datasets/DF2K
    dataroot_lq: datasets/DF2K
    meta_info: datasets/DF2K/meta_info/meta_info_DIV2K_sub_pair.txt
    io_backend:
      type: disk

    gt_size: 256
    use_hflip: True
    use_rot: False

    # data loader
    use_shuffle: true
    num_worker_per_gpu: 5
#batch_size_per_gpu: 12
    batch_size_per_gpu: 17
    dataset_enlarge_ratio: 1
    prefetch_mode: ~

  # Uncomment these for validation
  # val:
  #   name: validation
  #   type: PairedImageDataset
  #   dataroot_gt: path_to_gt
  #   dataroot_lq: path_to_lq
  #   io_backend:
  #     type: disk

# network structures
network_g:
  type: RRDBNet
  scale: 4
  num_in_ch: 3
  num_out_ch: 3
  num_feat: 64
  num_block: 23
  num_grow_ch: 32

network_d:
  type: UNetDiscriminatorSN
  num_in_ch: 3
  num_feat: 64
  skip_connection: True

# path
path:
  # use the pre-trained Real-ESRNet model
  pretrain_network_g: experiments/pretrained_models/RealESRGAN_x4plus.pth
  param_key_g: params_ema
  strict_load_g: true
  pretrain_network_d: experiments/pretrained_models/RealESRGAN_x4plus_netD.pth
  param_key_d: params
  strict_load_d: true
  resume_state: ~

# training settings
train:
  ema_decay: 0.999
  optim_g:
    type: Adam
    lr: !!float 1e-4
    weight_decay: 0
    betas: [0.9, 0.99]
  optim_d:
    type: Adam
    lr: !!float 1e-4
    weight_decay: 0
    betas: [0.9, 0.99]

  scheduler:
    type: MultiStepLR
    milestones: [400000]
    gamma: 0.5

  total_iter: 400000
  warmup_iter: -1  # no warm up

  # losses
  pixel_opt:
    type: L1Loss
    loss_weight: 1.0
    reduction: mean
  # perceptual loss (content and style losses)
  perceptual_opt:
    type: PerceptualLoss
    layer_weights:
      # before relu
      'conv1_2': 0.1
      'conv2_2': 0.1
      'conv3_4': 1
      'conv4_4': 1
      'conv5_4': 1
    vgg_type: vgg19
    use_input_norm: true
    perceptual_weight: !!float 1.0
    style_weight: 0
    range_norm: false
    criterion: l1
  # gan loss
  gan_opt:
    type: GANLoss
    gan_type: vanilla
    real_label_val: 1.0
    fake_label_val: 0.0
    loss_weight: !!float 1e-1

  net_d_iters: 1
  net_d_init_iters: 0

# Uncomment these for validation
# validation settings
# val:
#   val_freq: !!float 5e3
#   save_img: True

#   metrics:
#     psnr: # metric name
#       type: calculate_psnr
#       crop_border: 4
#       test_y_channel: false

# logging settings
logger:
  print_freq: 100
  save_checkpoint_freq: !!float 5e3
  use_tb_logger: true
  wandb:
    project: ~
    resume_id: ~

# dist training settings
dist_params:
  backend: nccl
  port: 29500
この設定でVRAMの使用量が23GBぐらい
・学習画像のペアファイル作成
cp /mnt/x/dataset/gray_tiles/* datasets/DF2K/gray/cp /mnt/x/dataset/tone_tiles/* datasets/DF2K/tone/python3 scripts/generate_meta_info_pairdata.py --input datasets/DF2K/gray datasets/DF2K/tone --meta_info datasets/DF2K/meta_info/meta_info_DIV2K_sub_pair.txt・学習途中のモデルで推論(お試し)
experiments/finetune_RealESRGANx4plus_400k_pairdata/models/net_g_大きな値が直近.pth
#!/bin/bash
cd ~
venvFile=`pwd`'/git/Real-ESRGAN/venv/bin/activate'
dataRoot='/mnt/z/work'
inputDir=$dataRoot'/in'
outputDir=$dataRoot'/out'
logfile=$dataRoot'/out/Real-ESRGAN.log'

cd $outputDir
if [ `ls -U1 | wc -l` -ne 0 ]; then
    rm -rf *
fi;
cd $inputDir
if [ `ls -U1 | wc -l` -eq 0 ]; then
    echo 'Not File';
    exit 1
fi;
cd ~/git/Real-ESRGAN
source $venvFile
echo '*** Real-ESRGAN Start ***' >> $logfile
date >> $logfile
python inference_realesrgan.py -n RealESRGAN_x4plus --model_path experiments/finetune_RealESRGANx4plus_400k_pairdata/models/net_g_大きな値が直近.pth --suffix '' -i $inputDir -o $outputDir >> $logfile
date >> $logfile
echo '*** Real-ESRGAN End ***' >> $logfile
deactivate
cd $inputDir
if [ `ls -U1 | wc -l` -ne 0 ]; then
    rm *
fi;
学習画像の記録
・元画像

・学習ステップ:5000

トーンがグレースケールになっていいます。のっぺりした感じ。
・学習ステップ:10000

詳細の情報量が増えました。
・学習ステップ:20000

以降は気持ち情報量が増えている感じがします。
・学習ステップ:40000

・学習ステップ:80000

・学習ステップ:115000


コメント