XAMLを使わないWPFでプロパティとのバインドを前回試しました。今回はICommandのオブジェクトとのバインドを試してみたいと思います。
サンプルコード
・プロジェクトの作成
dotnet new wpf -f net8.0 -n NoXAML03
cd NoXAML03
rm *.xaml
rm MainWindow.xaml.cs
ファイル名:NoXAML03.csproj
<Project Sdk="Microsoft.NET.Sdk">

  <PropertyGroup>
    <OutputType>WinExe</OutputType>
    <TargetFramework>net8.0-windows</TargetFramework>
    <Nullable>enable</Nullable>
    <ImplicitUsings>enable</ImplicitUsings>
    <UseWPF>true</UseWPF>
    <StartupObject>NoXAML03.App</StartupObject>
  </PropertyGroup>

</Project>
ファイル名:RelayCommand.cs
using System.Windows.Input;

namespace NoXAML03;
public class RelayCommand : ICommand
{
    private readonly Action<object?> _execute;
    private readonly Func<object?, bool>? _canExecute;

    public RelayCommand(Action<object?> execute, Func<object?, bool>? canExecute = null)
    {
        _execute = execute;
        _canExecute = canExecute;
    }

    public bool CanExecute(object? parameter) => _canExecute?.Invoke(parameter) ?? true;

    public void Execute(object? parameter) => _execute(parameter);

    public event EventHandler? CanExecuteChanged;
    public void RaiseCanExecuteChanged() => CanExecuteChanged?.Invoke(this, EventArgs.Empty);
}
ICommandの実装
ファイル名:MainWindowViewModel.cs
using System.Windows;
using System.Windows.Input;

namespace NoXAML03;

public class MainWindowViewModel
{
    public ICommand ClickCommand { get; }

    public MainWindowViewModel()
    {
        ClickCommand = new RelayCommand(_ =>
        {
            MessageBox.Show("ボタンがクリックされました!");
        });
    }
}
コマンドを実行するViewModel
ファイル名:App.xaml.cs
using System.Windows;
using System.Windows.Controls;
using System.Windows.Data;

namespace NoXAML03;

public class App : Application
{
    // エントリポイント
    [STAThread]
    public static void Main()
    {
        var app = new App();
        app.Startup += (sender, e) =>
        {
            var viewModel = new MainWindowViewModel();

            // UIの構築
            var button = new Button
            {
                Content = "クリックして実行",
                Width = 150,
                Height = 50,
                Margin = new Thickness(20)
            };

            // コマンドバインディング
            // Binding:CommandプロパティにViewModelのClickCommandをバインド
            var binding = new Binding("ClickCommand");
            BindingOperations.SetBinding(button, Button.CommandProperty, binding);

            // レイアウト
            var stackPanel = new StackPanel
            {
                Children = { button },
                VerticalAlignment = VerticalAlignment.Center,
                HorizontalAlignment = HorizontalAlignment.Center
            };

            // ウィンドウの構築と表示
            var window = new Window
            {
                Title = "ICommandオブジェクトとバインド",
                Width = 300,
                Height = 150,
                DataContext = viewModel,
                Content = stackPanel,
            };

            window.Show();

        };
        app.Run();
    }}
エントリポイント
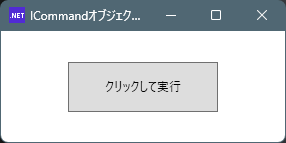
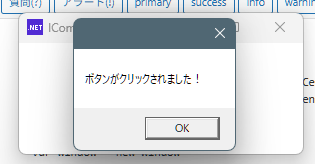
実行イメージ
1.ボタンをクリック
2.メッセージボックスが表示されます。
解説
ButtonのCommandプロパティとViewModelで定義したClickCommandをバインドは以下の部分で処理をしています。
 // Binding:CommandプロパティにViewModelのClickCommandをバインド
var binding = new Binding("ClickCommand");
BindingOperations.SetBinding(button, Button.CommandProperty, binding);
public static void BindingOperations.SetBinding(DependencyObject target, DependencyProperty dp, BindingBase binding);バインディングオブジェクトは生成したButtonオブジェクト
var button = new ButtonターゲットオブジェクトはButtonオブジェクトのCommandProperty
Button.CommandPropertyバインディングオブジェクトはビューモデルの
public ICommand ClickCommand { get; }からバインディングオブジェクトを生成
var binding = new Binding("ClickCommand");最後に
コマンドの場合、流れがView→ViewModelの一方通行のおかげか、双方向のプロパティのバインドよりシンプルな感じがします。

コメント