
StableSRは、名前からStable Diffusionの技術を利用した超解像手法のようです。
比較的新しい技術らしいので、興味が湧いたので、WSL2上のUbuntu22.04でインストールしてみました。
インストールしたPCのスペック
OS:Windows11 Pro 24H2 (WSL2 + Ubuntu22.04)
CPU:Ryzen7 5700X(8Core16Thread)
MEM:64GB (DDR4)
GPU:RTX4070(VRAM12G)
CUDAのバージョン情報(11.8)
nvcc --version
nvcc: NVIDIA (R) Cuda compiler driver
Copyright (c) 2005-2022 NVIDIA Corporation
Built on Wed_Sep_21_10:33:58_PDT_2022
Cuda compilation tools, release 11.8, V11.8.89
Build cuda_11.8.r11.8/compiler.31833905_0
nvidia-smi
Sat Aug 23 21:02:20 2025
+-----------------------------------------------------------------------------------------+
| NVIDIA-SMI 575.64.01 Driver Version: 576.80 CUDA Version: 12.9 |
|-----------------------------------------+------------------------+----------------------+
| GPU Name Persistence-M | Bus-Id Disp.A | Volatile Uncorr. ECC |
| Fan Temp Perf Pwr:Usage/Cap | Memory-Usage | GPU-Util Compute M. |
| | | MIG M. |
|=========================================+========================+======================|
| 0 NVIDIA GeForce RTX 4070 On | 00000000:06:00.0 On | N/A |
| 0% 39C P8 5W / 200W | 1092MiB / 12282MiB | 2% Default |
| | | N/A |
+-----------------------------------------+------------------------+----------------------+
+-----------------------------------------------------------------------------------------+
| Processes: |
| GPU GI CI PID Type Process name GPU Memory |
| ID ID Usage |
|=========================================================================================|
| No running processes found |
+-----------------------------------------------------------------------------------------+リポジトリのクローン
git clone https://github.com/IceClear/StableSR.git
cd StableSR
python3 -m venv venv
source venv/bin/activate
requirements.txtの編集及びインストール
・viでrequirements.txtを以下の内容で編集
ファイル名:requirements.txt
torch==1.13.1 --extra-index-url https://download.pytorch.org/whl/cu118
torchvision==0.14.1 --extra-index-url https://download.pytorch.org/whl/cu118
albumentations==1.3.0
opencv-python==4.6.0.66
imageio==2.9.0
numpy==1.23.1
imageio-ffmpeg==0.4.2
pytorch-lightning==1.4.2
omegaconf==2.1.1
test-tube>=0.7.5
streamlit==1.12.1
einops==0.3.0
transformers==4.19.2
webdataset==0.2.5
kornia==0.6
open_clip_torch==2.0.2
invisible-watermark>=0.1.5
streamlit-drawable-canvas==0.8.0
torchmetrics==0.6.0
xformers
triton
matplotlib
wandb
pillow
-e git+https://github.com/CompVis/taming-transformers.git@master#egg=taming-transformers
-e git+https://github.com/openai/CLIP.git@main#egg=clip
-e .
・インストール
pip install -r requirements.txtモデルのダウンロード
「StableSR」ディレクトリの直下に「weights」というディレクトリを作成し以下のファイルをダウンロードしました。
ls weights
stablesr_000117.ckpt  stablesr_768v_000139.ckpt  stablesr_turbo.ckpt  vqgan_cfw_00011.ckpt  webui_768v_139.safetensors
拡大用のスクリプト
パスは環境ごとに合わせる必要あり。
ファイル名:StableSR.sh
#!/bin/bash
cd ~
venvFile=`pwd`'/git/StableSR/venv/bin/activate'
dataRoot='/mnt/f'
inputDir=$dataRoot'/input'
outputDir=$dataRoot'/output'
logfile=$dataRoot'/logs/StableSR.log'

cd $outputDir
if [ `ls -U1 | wc -l` -ne 0 ]; then
    rm -rf *
fi;
cd $inputDir
if [ `ls -U1 | wc -l` -eq 0 ]; then
    echo 'Not File';
    exit 1
fi;
cd ~/git/StableSR
source $venvFile
echo '*** StableSR Start ***' >> $logfile
date >> $logfile
PYTHONPATH=$PWD:$PYTHONPATH \
python scripts/sr_val_ddpm_text_T_vqganfin_oldcanvas_tile.py \
        --config configs/stableSRNew/v2-finetune_text_T_512.yaml \
        --ckpt weights/stablesr_turbo.ckpt \
        --vqgan_ckpt weights/vqgan_cfw_00011.ckpt \
        --init-img $inputDir --outdir $outputDir \
        --ddpm_steps 4 --dec_w 0.5 --seed 42 --n_samples 1 \
        --colorfix_type wavelet --upscale 4 \
        --vqgantile_size 768 --vqgantile_stride 512 --tile_overlap 48
date >> $logfile
echo '*** StableSR End ***' >> $logfile
deactivate
cd $inputDir
if [ `ls -U1 | wc -l` -ne 0 ]; then
    rm *
fi;
ホストOS(Windows11)のFドライブにinputとoutputというディレクトリがあり、inputに拡大処理したい画像ファイルをコピーし、実行し結果がoutputが出力されるスクリプトになっています。
実行結果
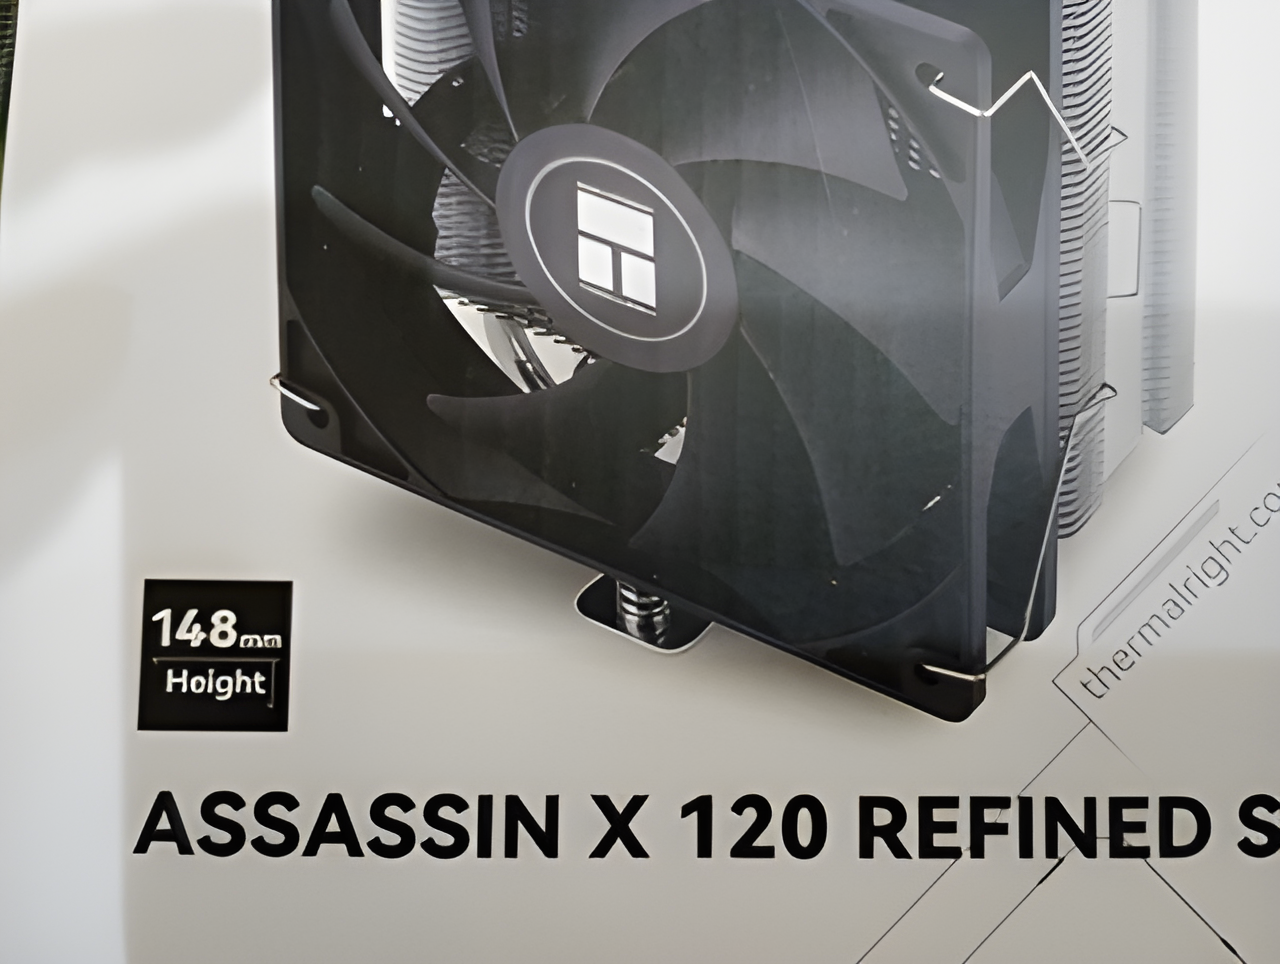
・元画像
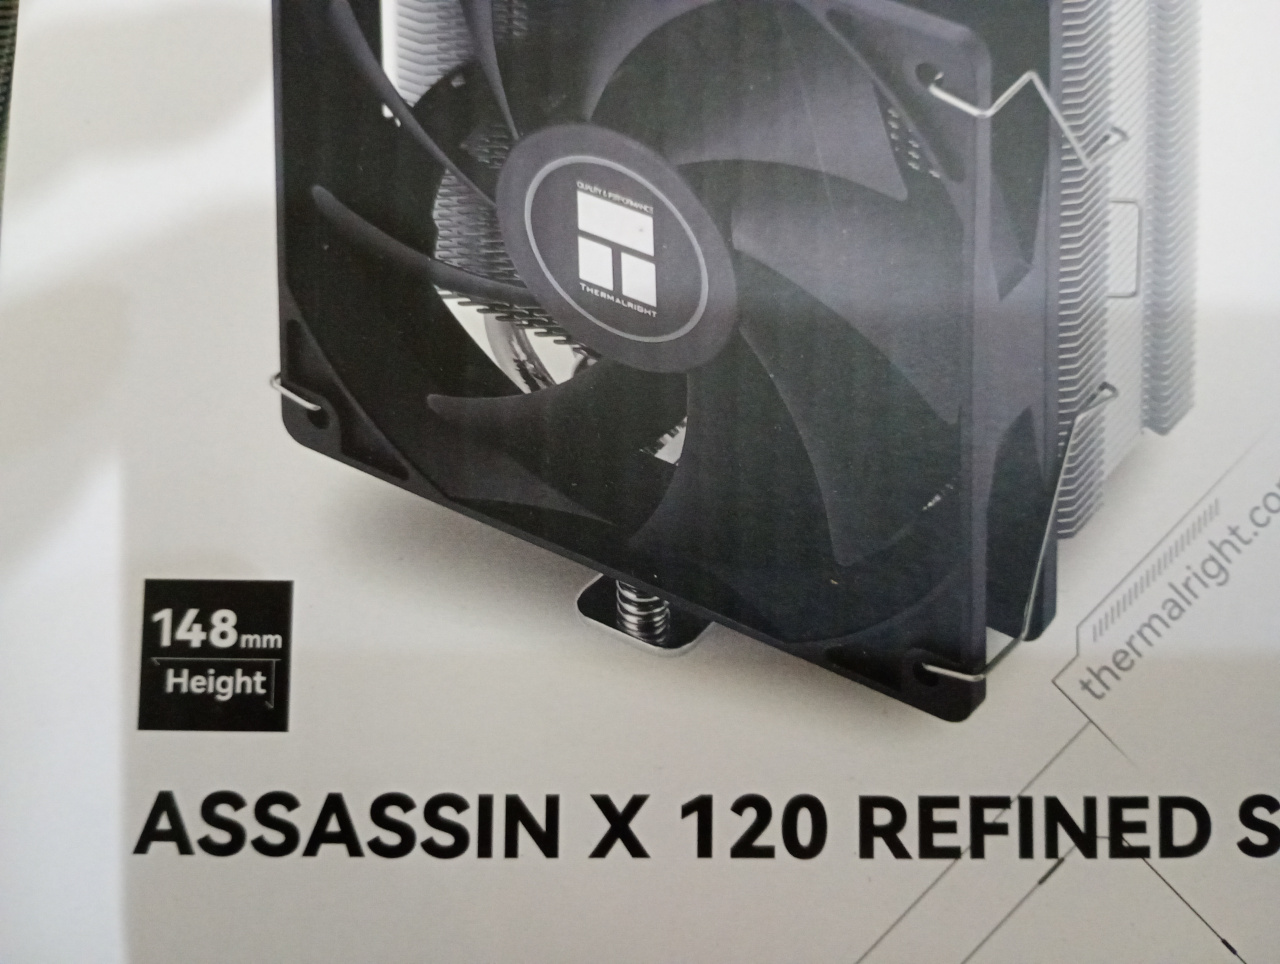
こちらの画像をペイントで25%に縮小した画像を拡大します。
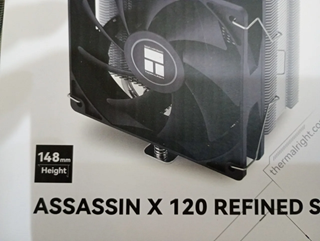
・StableSRで4倍に拡大した画像

・Real-ESRGANで4倍に拡大した画像(比較用)
・感想
元のjpegのぼやっとした画像より、縮小⇒拡大処理を行うStableSRやReal-ESRGANの画像ほうが、パキッとした画像になっていて、AIを使った超解像の利点の一つだと思います。
StabeSRとReal-ESRGANは一見すると同じ様に見えますが、写真内のCPUクーラーのファンを止めているクリップ周辺のサイドフィンをよく見ると、Real-ESRGANはフィンが潰れていますが、StableSRだとフィンがしっかり描画されています。
・感想2
自分が扱う画像の場合、Real-ESRGANと比べてStableSRの方が1段解像度が高い感じがします。一見すると同じような仕上がりですが、詳細部分が曖昧なReal-ESRGANとしっかり書き込まれるStableSRといった印象です。
StableSRの処理はかなり重いです。1000×1500ぐらいの画像の処理で1枚で数分ほど時間が掛かります。実行しているPCのスペックにもよりますが、Real-ESRGANと比べてかなり処理時間を覚悟する必要があります。VRAMは12GB以内におさまりますが、処理している最中は他の作業に支障が出ますのでAI専用PCが欲しくなります。


コメント