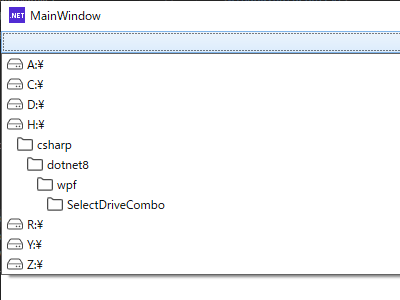
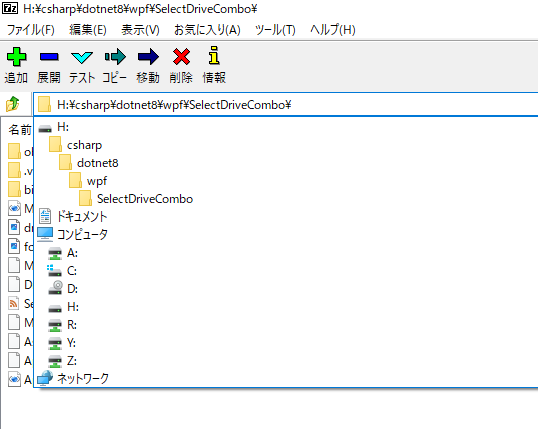
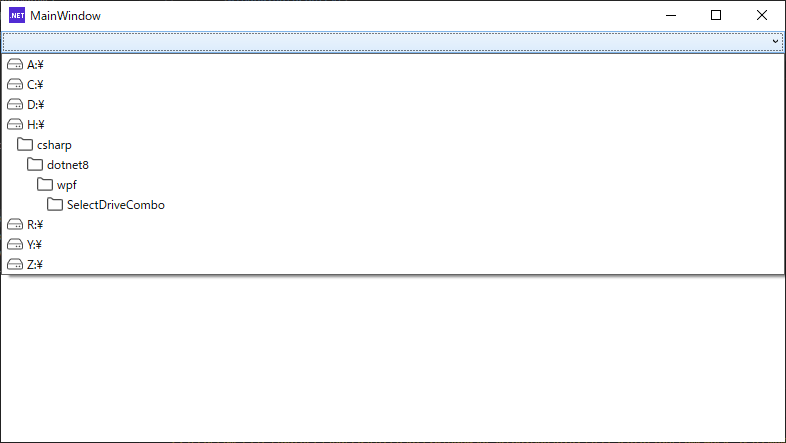
カレントディレクトリを変更するために、コンボボックスを使ってドライブの一覧を選択するUIがあります。
また、ドライブだけではなくカレントディレクトリとその上位階層も選択するようになっていると便利です。
実際作れるか挑戦してみました。
ソースコード
ファイル名:MainWindow.xaml
<Window x:Class="SelectDriveCombo.MainWindow"
        xmlns="http://schemas.microsoft.com/winfx/2006/xaml/presentation"
        xmlns:x="http://schemas.microsoft.com/winfx/2006/xaml"
        xmlns:d="http://schemas.microsoft.com/expression/blend/2008"
        xmlns:mc="http://schemas.openxmlformats.org/markup-compatibility/2006"
        xmlns:i="clr-namespace:Microsoft.Xaml.Behaviors;assembly=Microsoft.Xaml.Behaviors"
        xmlns:interactivity="clr-namespace:Reactive.Bindings.Interactivity;assembly=ReactiveProperty.WPF"
        xmlns:local="clr-namespace:SelectDriveCombo"
        mc:Ignorable="d"
        Title="MainWindow" Height="450" Width="800">
    <Window.DataContext>
        <local:MainWindowViewModel />
    </Window.DataContext>
    <i:Interaction.Triggers>
        <i:EventTrigger EventName="Closed">
            <interactivity:EventToReactiveCommand Command="{Binding WindowClosedCommand}" />
        </i:EventTrigger>
    </i:Interaction.Triggers>
    <Grid>
        <StackPanel>
            <ComboBox
                SelectedValuePath="FullPath"
                SelectedValue="{Binding DrivesSelected.Value}"
                ItemsSource="{Binding Drives}">
                <ComboBox.ItemTemplate>
                    <DataTemplate>
                        <StackPanel
                            Orientation="Horizontal">
                            <Image Margin="{Binding Margin}" Source="{Binding IconPath}" />
                            <TextBlock Margin="4,0,0,0" Text="{Binding Name}"></TextBlock>
                        </StackPanel>
                    </DataTemplate>
                </ComboBox.ItemTemplate>
            </ComboBox>
        </StackPanel>
    </Grid>
</Window>
ファイル名:MainWindowViewModel.cs
using System;
using System.ComponentModel;
using Reactive.Bindings;
using Reactive.Bindings.Extensions;
using System.Reactive.Disposables;

using System.Diagnostics;
using System.Data.Common;
using System.IO;
using System.Runtime.CompilerServices;

using System.Drawing;
using System.Windows.Media.Imaging;

namespace SelectDriveCombo;

public class MainWindowViewModel : INotifyPropertyChanged, IDisposable
{
    public event PropertyChangedEventHandler? PropertyChanged;
    protected virtual void OnPropertyChanged(string name)
    {
        if (PropertyChanged is not null)
            PropertyChanged(this, new PropertyChangedEventArgs(name));
    }
    private CompositeDisposable Disposable { get; } = new ();
    public void Dispose() => Disposable.Dispose();
    public ReactiveCommand<EventArgs> WindowClosedCommand { get; }

    public ReactiveProperty<string> DrivesSelected { get; set; } = new("");
    public ReactiveCollection<DriveEntity> Drives { get; set; } = new();

    public MainWindowViewModel()
    {
        WindowClosedCommand = new ReactiveCommand<EventArgs>()
            .WithSubscribe(e => Disposable.Dispose());

        // カレントディレクトリを取得
        var carrentDir = Directory.GetCurrentDirectory();
        // カレントドライブを取得
        var carrentDrive = Path.GetPathRoot(carrentDir) ?? "";
        // クリア
        Drives.ClearOnScheduler();
        // ドライブの一覧を取得
        foreach(var drive in Directory.GetLogicalDrives())
        {
            // 追加
            Drives.AddOnScheduler
            (
                new DriveEntity{ Name = drive, FullPath = drive, IconPath = @"H:\csharp\dotnet8\wpf\SelectDriveCombo\drive.png"  }
            );
            if (drive.Equals(carrentDrive, StringComparison.CurrentCultureIgnoreCase))
            {
                string tmp = carrentDir;
                Stack<string> tmps = new();
                while(!carrentDrive.Equals(tmp, StringComparison.CurrentCultureIgnoreCase))
                {
                    tmps.Push(tmp);
                    tmp = Path.GetDirectoryName(tmp) ?? carrentDrive;
                }
                int i = 1;
                foreach(var t in tmps)
                {
                    string name = Path.GetFileName(t);
                    Drives.AddOnScheduler
                    (
                        new DriveEntity{ Name = name, FullPath = t, MarginLeft = (i * 10),  IconPath = @"H:\csharp\dotnet8\wpf\SelectDriveCombo\folder.png" }
                    );
                    i++;
                }
            }
        }
        // 選択されたドライブを表示
        DrivesSelected.Subscribe(e=>
        {
            Debug.Print(DrivesSelected.Value);
        });
    }
}
ファイル名:DriveEntity.cs
public class DriveEntity
{
    public string Name { get; set; } = "";
    public string FullPath { get; set; } = "";
    public string IconPath { get; set; } = "";
    public int MarginLeft { get; set; } = 0;

    public string Margin { get { return $"{MarginLeft},0,0,0"; } }
}
結果
ドライブやフォルダのアイコンはシステムアイコンを使おうと思ったのですが、System.Drawing.IconからWPFのBitmapSourceへの変換が面倒なので、icooon-monoさんのアイコンをお借りしてきました。
WPFのComboBoxは選択項目の中に色々なコントロールをトッピングすることが出来ます。今回はアイコン用にImageと表示文字用にTextBoxを配置して見ました。各々の項目にデータバインドする形でXAMLとC#間でデータが連動することが確認できました。


コメント