ペイントソフトなどによくある塗りつぶし機能をC#で作成してみました。
使い方
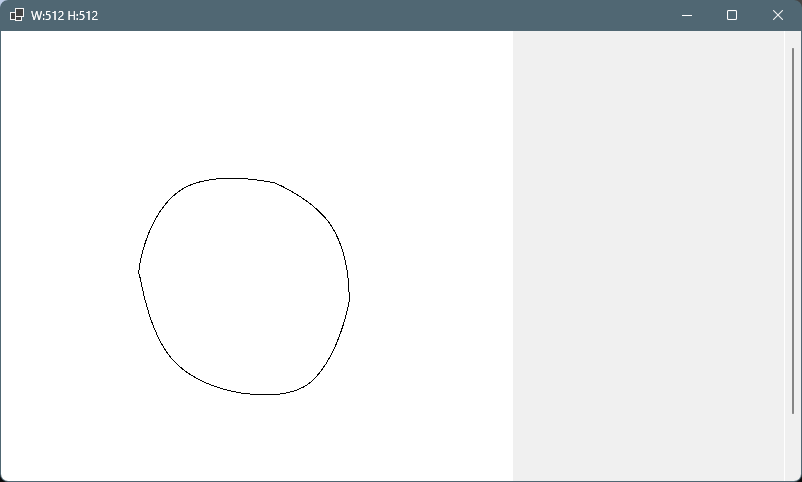
- ペイントソフトから画像コピー
- 当アプリでCtrl+Vで画像を貼り付け
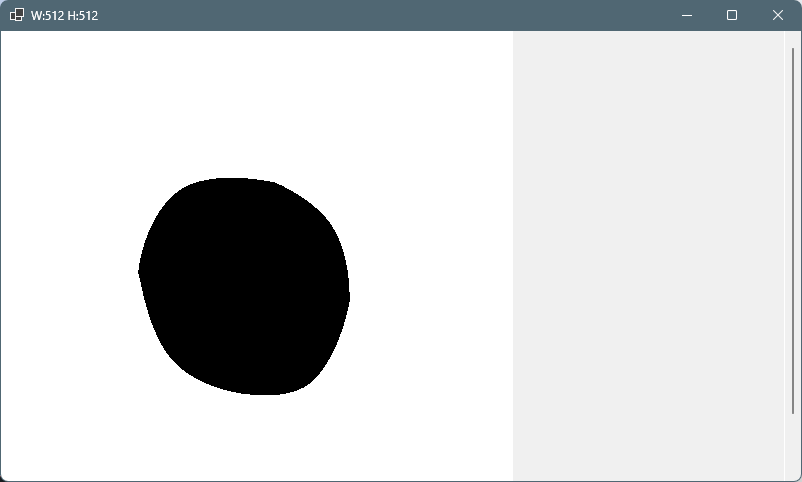
- マウスをクリックするとクリックした座標から塗りつぶしが開始します。
- Ctrl+Cで画像がクリップボードに保存されますので、結果画像をペイントソフトで張り付けることが出来ます。
ソースコード
using System.Diagnostics;

namespace BaketuNuri01;

public partial class Form1 : Form
{
    /**************************************************************************
    * 塗潰し
    **************************************************************************/
    static void Fill(Bitmap bmp, Point point, Color targetColor, Color replacementColor)
    {
        // Point型のオブジェクトをセットするキュー
        Queue<Point> queue = new();

        // キューに最初の座標をセット
        queue.Enqueue(point);

        // キューが空になるまでループする
        while (queue.Count > 0)
        {
            // キューから一つ要素を取り出す。
            var currentPoint = queue.Dequeue();

            // 座標が範囲外か確認
            if (currentPoint.X < 0 || currentPoint.X >= bmp.Width || currentPoint.Y < 0 || currentPoint.Y >= bmp.Height)
            {
                continue;
            }

            // 現在の座標の色を取得
            Color currentColor = bmp.GetPixel(currentPoint.X, currentPoint.Y);

            // 座標の色が塗潰し対象の色と異なるか確認
            if (currentColor != targetColor)
            {
                continue;
            }

            // 座標に塗潰し色をセット
            bmp.SetPixel(currentPoint.X, currentPoint.Y, replacementColor);

            // 左右上下の座標をキューに登録
            queue.Enqueue(new Point(currentPoint.X + 1, currentPoint.Y));
            queue.Enqueue(new Point(currentPoint.X - 1, currentPoint.Y));
            queue.Enqueue(new Point(currentPoint.X, currentPoint.Y + 1));
            queue.Enqueue(new Point(currentPoint.X, currentPoint.Y - 1));
        }
    }

    // ピクチャボックス
    PictureBox PictureBox1 = new()
    {
        SizeMode = PictureBoxSizeMode.AutoSize,
        Location = new Point(0, 0),
    };
    // パネル
    Panel Panel1 = new()
    {
        AutoScroll = true,  // スクロールバーお着ける
        Dock = DockStyle.Fill,
    };

    // コンストラクタ
    public Form1()
    {
        InitializeComponent();

        // コントロールの登録
        Panel1.Controls.Add(PictureBox1);
        this.Controls.Add(Panel1);

        // キーボードイベントをフォームで受け取る
        this.KeyPreview = true;

        // キーダウンイベント
        this.KeyDown += (sender, e) => Form1_KeyDown(sender, e);
        // マウスクリックイベント
        PictureBox1.MouseClick += (sender, e) => PictureBox1_MouseClick(sender, e);
    }

    // キーダウンイベント
    void Form1_KeyDown(object? sender, KeyEventArgs e)
    {
        // Ctrl+V
        if ((e.Modifiers & Keys.Control) == Keys.Control && e.KeyCode == Keys.V)
        {
            // クリップボードから画像を取り出し
            var img = Clipboard.GetImage();
            if (img is not null)
            {
                PictureBox1.Image?.Dispose();
                PictureBox1.Image = img;
                this.Text = $"W:{img.Width} H:{img.Height}";
            }
        }
        // Ctrl+C
        if ((e.Modifiers & Keys.Control) == Keys.Control && e.KeyCode == Keys.C)
        {
            if (PictureBox1.Image is not null)
            {
                // クリップボードへ画像をコピー
                var ms = new MemoryStream();
                PictureBox1.Image.Save(ms, System.Drawing.Imaging.ImageFormat.Png);
                Clipboard.SetData("PNG", ms);
                this.Text = $"クリップボードに画像をコピーしました。";
            }
        }
    }

    // マウスクリックイベント
    void PictureBox1_MouseClick(object? sender, MouseEventArgs e)
    {
        if (PictureBox1.Image is null) return;

        Bitmap bmp = (Bitmap)PictureBox1.Image;
        Color targetColor = bmp.GetPixel(e.X, e.Y);
        Color replacementColor = Color.Black; // 塗りつぶす色

        Fill(bmp, e.Location, targetColor, replacementColor);
        PictureBox1.Image = bmp;
    }

}
感想
簡素な作りですが、個人的な実用アプリだったりします。
マスク用に2値画像をつくるのですが、ペイントツールの塗りつぶしが高機能すぎまして余計な場所まで塗りつぶされてしまうので、領域判定を斜め方向見ないシンプルな塗りつぶし仕様のアプリを作りました。
SetPixel()は体感できるレベルで遅いですが、強い意志を持ってこのまま使いたいと思います。
マスク用に2値画像をつくるのですが、ペイントツールの塗りつぶしが高機能すぎまして余計な場所まで塗りつぶされてしまうので、領域判定を斜め方向見ないシンプルな塗りつぶし仕様のアプリを作りました。
SetPixel()は体感できるレベルで遅いですが、強い意志を持ってこのまま使いたいと思います。

コメント