C#のWinFormsで画像加工アプリ5「LUTによる減色」

コンピュータ

LUTを使って減色処理を行います。

ソースコード

ファイル名:Form1.cs(前回の記事のソースコードに追加)

    // 減色処理(Form1のメンバーとして追加)
    readonly ToolStripMenuItem dietColorMenuItem = new()
    {
        Text = "減色",
    };
        // 減色処理(Form1のコンストラクタに追加)
        filterMenuItem.DropDownItems.Add(dietColorMenuItem);
        dietColorMenuItem.Click += (s, e) =>
        {
            if (_buffBmp is null) return;
            Bitmap? bmp = DietColorDialog(_buffBmp);
            if (bmp is not null)
            {
                this.Bmp = bmp;
                mainPicbox.Image = this.Bmp;
            }
        };

ファイル名:Form1.DietColor.cs(新規追加)

using OpenCvSharp;
using OpenCvSharp.Extensions;

namespace GazouKakou01;
public partial class Form1 : Form
{
    public static Bitmap? DietColorDialog(Bitmap src)
    {
        const string filterName = "減色";

        Form frm = new Form
        {
            FormBorderStyle = FormBorderStyle.FixedDialog,
            ClientSize = new System.Drawing.Size(640, 480),
            Text = filterName,
        };
        Label lbl = new Label
        {
            Size = new System.Drawing.Size(600, 60),
            Location = new System.Drawing.Point(10, 10),
            Text = filterName,
        };
        lbl.Parent = frm;
        PictureBox picbox = new()
        {
            Size = new System.Drawing.Size(600, 320),
            Location = new System.Drawing.Point(10, 70),
            Parent = frm,
        };
        Button okBtn = new Button
        {
            Size = new System.Drawing.Size(80,40),
            Location = new System.Drawing.Point(10, 410),
            Text = "OK",
            DialogResult = DialogResult.OK,
        };
        okBtn.Parent = frm;
        Button cancelBtn = new Button
        {
            Size = new System.Drawing.Size(80,40),
            Location = new System.Drawing.Point(100, 410),
            Text = "Cancel",
            DialogResult = DialogResult.Cancel,
        };
        cancelBtn.Parent = frm;

        frm.AcceptButton = okBtn;
        frm.CancelButton = cancelBtn;

        Label label1 = new()
        {
            Size = new System.Drawing.Size(120,40),
            Location = new System.Drawing.Point(190, 410),
            Parent = frm,
        };
        TrackBar track1 = new()
        {
            Minimum = 2,
            Maximum = 64,
            Value = 64,
            TickFrequency = 2,
            SmallChange = 2,
            LargeChange = 8,
            Size = new System.Drawing.Size(100,40),
            Location = new System.Drawing.Point(320, 410),
            Parent = frm,
        };

        // mat変換
        var srcMat = BitmapConverter.ToMat(src);


        // 減色処理
        bool filterExecFlag = false;
        Func<Mat, int, Mat> filter = new((src, n)=>
        {
            filterExecFlag = true;
            Mat dst = new();

            byte[] lut = new byte[256];
            int x = lut.Length;
            int div = x / n;
            int min = 0;
            int max = x - 1;
            int center = x / 2;
            for(int i=0; i < lut.Length; i++)
            {
                int a = i / div;
                int b;

                if (i < center)
                {
                    b = a * div - 1;
                } else {
                    b = (a + 1) * div - 1;
                }
                b = (b < min) ? min : b;
                b = (b > max) ? max : b;

                lut[i] = (byte)b;
            }
            Cv2.LUT(src, lut, dst);

            filterExecFlag = false;
            return dst;
        });
        track1.ValueChanged += async (s, e) =>
        {
            Mat? dstMat = null;
            int n = track1.Value;
            label1.Text = String.Format("減色:{0}", n * srcMat.Channels());

            if (filterExecFlag) return;

            int backupValue;
            do {
                backupValue = n;
                dstMat?.Dispose();
                dstMat = await Task.Run(()=> filter(srcMat, n));
                n = track1.Value;
            } while (backupValue != n);
            
            picbox.Image?.Dispose();
            picbox.Image = BitmapConverter.ToBitmap(dstMat);
            dstMat?.Dispose();
        };
        
        frm.Load += (s, e) =>
        {
            track1.Value = 8;
        };

        if (frm.ShowDialog() == DialogResult.Cancel)
        {
            return null;
        } else {
            return (Bitmap)picbox.Image;
        }
    }
}

実行

画像が表示されている状態でメインメニュー「フィルター」→「減色」を選ぶ

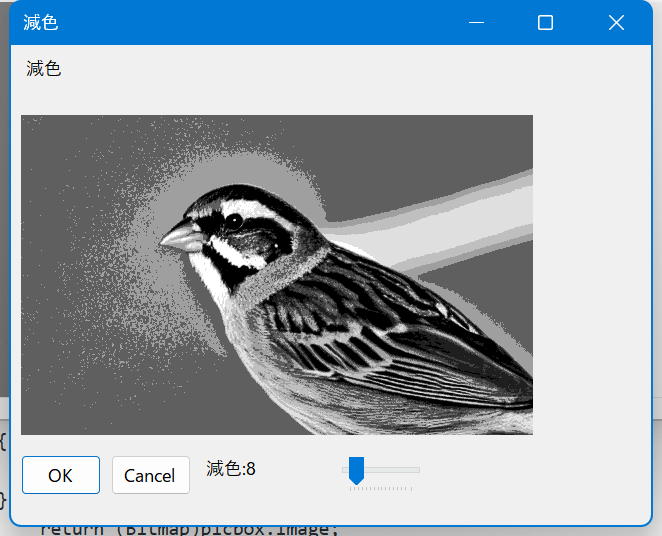
注)グレースケールでの動作を想定してるのでカラー画像での場合動作は未確認

解説

OpenCVにはk-means法を使った減色用のメソッドがあるのですが、OpenCVSharpでの使い方を筆者は理解していません。
ということで、今回はLUTを使い減色処理を行ってみました。LUTで色を置き換えるテーブルを減色されるように値をセットしてあります。
アルゴリズムとしては0~255の数字に対して減色したい色数を割り算して求めています。ただし、最小値が0最大値が255になるように調整しており、指定の色数を超える可能性があります。

コメント