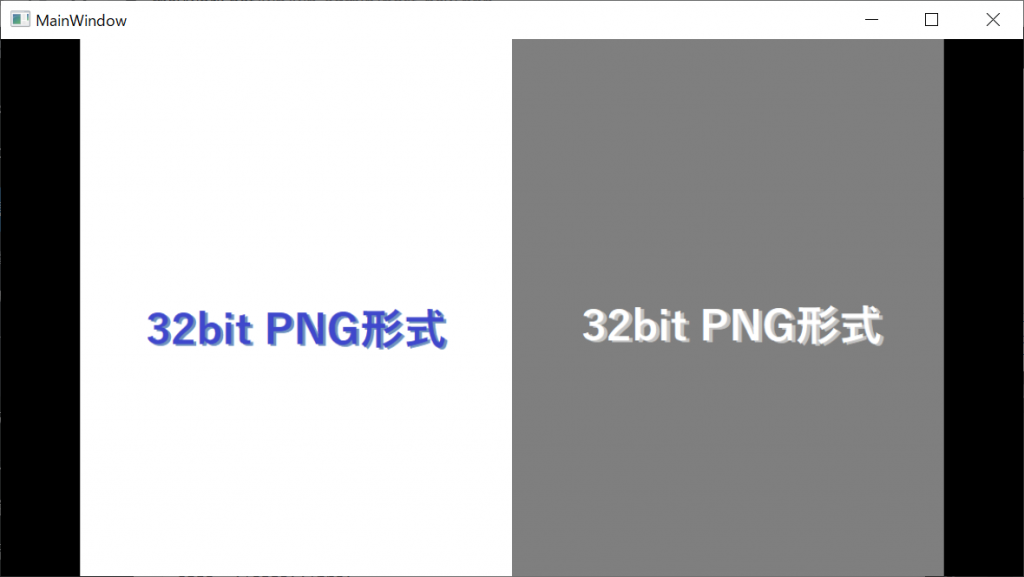
書籍の見開き表示のように2枚の画像ファイルを左右に表示させたい。
プロジェクトの作成
mkdir プロジェクト名
cd プロジェクト名
dotnet new wpf
code .
ソースコード
ファイル名:MainWindow.xaml
<Window x:Class="Sample55CopyPixels.MainWindow"
        xmlns="http://schemas.microsoft.com/winfx/2006/xaml/presentation"
        xmlns:x="http://schemas.microsoft.com/winfx/2006/xaml"
        xmlns:d="http://schemas.microsoft.com/expression/blend/2008"
        xmlns:mc="http://schemas.openxmlformats.org/markup-compatibility/2006"
        xmlns:local="clr-namespace:Sample55CopyPixels"
        mc:Ignorable="d"
        Title="MainWindow" Height="450" Width="800">
    <Grid>
        <StackPanel>
            <Image Name="Image1">
            </Image>
        </StackPanel>
    </Grid>
</Window>
ファイル名:MainWindow.xaml.cs
using System;
using System.Collections.Generic;
using System.Linq;
using System.Text;
using System.Threading.Tasks;
using System.Windows;
using System.Windows.Controls;
using System.Windows.Data;
using System.Windows.Documents;
using System.Windows.Input;
using System.Windows.Media;
using System.Windows.Media.Imaging;
using System.Windows.Navigation;
using System.Windows.Shapes;

using System.IO;

namespace Sample55CopyPixels
{
    /// <summary>
    /// Interaction logic for MainWindow.xaml
    /// </summary>
    public partial class MainWindow : Window
    {
        public MainWindow()
        {
            InitializeComponent();

            // 左側画像の読み込み
            var leftPath = @"C:\Users\asagao\Pictures\202108070814.png";
            var lb = new BitmapImage();
            using (var fs = new FileStream(leftPath, FileMode.Open, FileAccess.Read))
            {
                lb.BeginInit();
                lb.CacheOption = BitmapCacheOption.OnLoad;
                lb.StreamSource = fs;
                lb.EndInit();
            }
            lb.Freeze();

            // 左側画像をbyte配列にコピー
            int lb_stride = lb.PixelWidth * 4;
            byte[] lb_datas = new byte[lb_stride * lb.PixelHeight];
            lb.CopyPixels(new Int32Rect(0, 0, lb.PixelWidth, lb.PixelHeight), lb_datas, lb_stride, 0);

            // 右側画像の読み込み
            var rightPath = @"C:\Users\asagao\Pictures\202108070821.png";
            var rb = new BitmapImage();
            using (var fs = new FileStream(rightPath, FileMode.Open, FileAccess.Read))
            {
                rb.BeginInit();
                rb.CacheOption = BitmapCacheOption.OnLoad;
                rb.StreamSource = fs;
                rb.EndInit();
            }
            rb.Freeze();

            // 右側画像をbyte配列にコピー
            int rb_stride = rb.PixelWidth * 4;
            byte[] rb_datas = new byte[rb_stride * rb.PixelHeight];
            rb.CopyPixels(new Int32Rect(0, 0, rb.PixelWidth, rb.PixelHeight), rb_datas, rb_stride, 0);

            // 表示画像の作成
            int height = lb.PixelHeight;
            int width = (int)((height/9)*16);
            var wb = new WriteableBitmap(
                width,
                height,
                lb.DpiX,
                lb.DpiY,
                lb.Format,
                null);

            // 貼り付け先のx座標を計算
            int x = (int)((width - (lb.PixelWidth + rb.PixelWidth))/2);

            // 画像をコピー
            wb.WritePixels(
                new Int32Rect(x, 0, lb.PixelWidth, lb.PixelHeight),
                lb_datas,
                lb_stride,
                0);
            wb.WritePixels(
                new Int32Rect(x+lb.PixelWidth, 0, rb.PixelWidth, rb.PixelHeight),
                rb_datas,
                rb_stride,
                0);
            wb.Freeze();


            // イメージコントロールのソースにビットマップイメージを割り当て
            Image1.Source = wb;
        }
    }
}
感想
成功すると画像が表示されます。

StackPanelとImageコントロールの組み合わせで画像を表示すると幅を基準に調整されて表示されてしまいます。
縦長の画像を横長のウィンドウに表示する場合、画像の下部が見切れてしまいます。
ImageコントロールのStretchプロパティで領域を埋める方法を試してみましたが、残念ながら画像の全体が表示されるように調整してくれる選択肢を見つけることが出来ませんでした。
苦肉の策として画像の高さを基準に16:9の画像を作成し左右に画像をコピー貼り付けをしてみました。
もっと正しいやり方がありそうな気がしますが、とりあえず目的は達成できたので良しとします。


コメント