OpenCVで四角や円、直線など基本的な図形を描画してみたいと思います。
プロジェクトの作成
mkdir プロジェクト名
cd プロジェクト名
dotnet new wpf
dotnet add package OpenCvSharp4.Windows
code .
ソースコード
ファイル名:MainWindow.xaml
<Window x:Class="Zukei.MainWindow"
        xmlns="http://schemas.microsoft.com/winfx/2006/xaml/presentation"
        xmlns:x="http://schemas.microsoft.com/winfx/2006/xaml"
        xmlns:d="http://schemas.microsoft.com/expression/blend/2008"
        xmlns:mc="http://schemas.openxmlformats.org/markup-compatibility/2006"
        xmlns:local="clr-namespace:Zukei"
        mc:Ignorable="d"
        Title="MainWindow" Height="450" Width="800">
    <Grid>
        <Image x:Name="Image1" />
    </Grid>
</Window>
ファイル名:MainWindow.xaml.cs
using System;
using System.Collections.Generic;
using System.Linq;
using System.Text;
using System.Threading.Tasks;
using System.Windows;
using System.Windows.Controls;
using System.Windows.Data;
using System.Windows.Documents;
using System.Windows.Input;
using System.Windows.Media;
using System.Windows.Media.Imaging;
using System.Windows.Navigation;
using System.Windows.Shapes;
using OpenCvSharp;
using OpenCvSharp.WpfExtensions;
namespace Zukei
{
/// <summary>
/// Interaction logic for MainWindow.xaml
/// </summary>
public partial class MainWindow : System.Windows.Window
{
public MainWindow()
{
InitializeComponent();
// 白色背景のキャンバスを作成
using(var mat = new Mat(new OpenCvSharp.Size(256, 256), MatType.CV_8U, Scalar.All(255)))
{
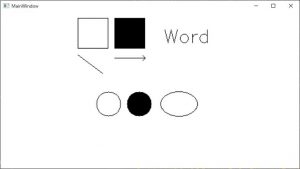
// 四角形
Cv2.Rectangle(mat, new OpenCvSharp.Rect(10,10,50,50), new Scalar(0));
// 塗りつぶされた四角形
Cv2.Rectangle(mat, new OpenCvSharp.Rect(70,10,50,50), new Scalar(0));
Cv2.FloodFill(mat, new OpenCvSharp.Point(71,11), new Scalar(0));
// 線
Cv2.Line(mat, 10, 70, 50, 100, new Scalar(0));
// 矢印
Cv2.ArrowedLine(mat, new OpenCvSharp.Point(70,75), new OpenCvSharp.Point(120,75), new Scalar(0));
// 円
Cv2.Circle(mat, 60, 150, 20, new Scalar(0));
// 塗りつぶされた円
Cv2.Circle(mat, 110, 150, 20, new Scalar(0));
Cv2.FloodFill(mat, new OpenCvSharp.Point(110,150), new Scalar(0));
// 楕円
Cv2.Ellipse(mat, new OpenCvSharp.Point(175,150), new OpenCvSharp.Size(30, 20), 360.0, 0.0, 360.0, new Scalar(0));
// 文字列
Cv2.PutText(mat, "Word", new OpenCvSharp.Point(150, 50), HersheyFonts.HersheySimplex, 1.0, new Scalar(0));
// matオブジェクトをビットマップソースに変換しImage1のソースにセット
Image1.Source = BitmapSourceConverter.ToBitmapSource(mat);
}
}
}
}実行結果
PointやSizeなどのクラス名が被るのでOpenCvSharpを指定しています。
Matオブジェクト作成時に幅や高さ及び色を指定しています。
文字列を描画する方法があるのは有難いのですが、残念ながら日本語は受け付けてくれませんでした。

コメント