別ウィンドウの作り方を学びたいと思います。
Windows10 2004
dotnet –version 5.0.104
Visual Studio Code
PowerShell 5.1
dotnet –version 5.0.104
Visual Studio Code
PowerShell 5.1
プロジェクトの作成
mkdir プロジェクト名
cd プロジェクト名
dotnet new wpf
dotnet add package Microsoft.Xaml.Behaviors.Wpf
dotnet add package ReactiveProperty.WPF
code .
ソースコード
ファイル名:MainWindow.xaml
<Window x:Class="WpfSample20SubWindow.MainWindow"
        xmlns="http://schemas.microsoft.com/winfx/2006/xaml/presentation"
        xmlns:x="http://schemas.microsoft.com/winfx/2006/xaml"
        xmlns:d="http://schemas.microsoft.com/expression/blend/2008"
        xmlns:mc="http://schemas.openxmlformats.org/markup-compatibility/2006"
        xmlns:i="clr-namespace:Microsoft.Xaml.Behaviors;assembly=Microsoft.Xaml.Behaviors"
        xmlns:interactivity="clr-namespace:Reactive.Bindings.Interactivity;assembly=ReactiveProperty.WPF"
        xmlns:local="clr-namespace:WpfSample20SubWindow"
        mc:Ignorable="d"
        Title="MainWindow" Height="450" Width="800">
    <Window.DataContext>
        <local:MainWindowViewModel />
    </Window.DataContext>
    <Grid>
        <StackPanel>
            <Label Content="{Binding Message.Value}" />
            <Button Content="押す" Command="{Binding PushButtonCommand}" />
        </StackPanel>
    </Grid>
</Window>
ファイル名:MainWindowViewModel.cs
using System.ComponentModel;
using Reactive.Bindings;
using System.Windows;
using System;

namespace WpfSample20SubWindow
{
    public class MainWindowViewModel : INotifyPropertyChanged
    {
        public event PropertyChangedEventHandler PropertyChanged;
        protected virtual void OnPropertyChanged(string name) => PropertyChanged(this, new PropertyChangedEventArgs(name));

        public ReactiveProperty<string> Message { get; private set; } = new ReactiveProperty<string>("結果");
        public ReactiveCommand PushButtonCommand { get; } = new ReactiveCommand();
        public MainWindowViewModel()
        {
            PropertyChanged += (o, e) => {};

            PushButtonCommand.Subscribe(_ => {
                var sub = new SubWindow();
                sub.ShowDialog();
                Message.Value = string.Format("{0}", ((SubWindowViewModel)sub.DataContext).Field.Value);
            });
        }
    }
}
ファイル名:SubWindow.xaml
<Window x:Class="WpfSample20SubWindow.SubWindow"
        xmlns="http://schemas.microsoft.com/winfx/2006/xaml/presentation"
        xmlns:x="http://schemas.microsoft.com/winfx/2006/xaml"
        xmlns:d="http://schemas.microsoft.com/expression/blend/2008"
        xmlns:mc="http://schemas.openxmlformats.org/markup-compatibility/2006"
        xmlns:i="clr-namespace:Microsoft.Xaml.Behaviors;assembly=Microsoft.Xaml.Behaviors"
        xmlns:interactivity="clr-namespace:Reactive.Bindings.Interactivity;assembly=ReactiveProperty.WPF"
        xmlns:local="clr-namespace:WpfSample20SubWindow"
        mc:Ignorable="d"
        Title="SubWindow" Height="450" Width="800">
    <Window.DataContext>
        <local:SubWindowViewModel />
    </Window.DataContext>
    <Grid>
        <StackPanel>
            <TextBox Text="{Binding Field.Value}" />
        </StackPanel>
    </Grid>
</Window>
ファイル名:SubWindow.xaml.cs
using System;
using System.Collections.Generic;
using System.Linq;
using System.Text;
using System.Threading.Tasks;
using System.Windows;
using System.Windows.Controls;
using System.Windows.Data;
using System.Windows.Documents;
using System.Windows.Input;
using System.Windows.Media;
using System.Windows.Media.Imaging;
using System.Windows.Navigation;
using System.Windows.Shapes;

namespace WpfSample20SubWindow
{
    public partial class SubWindow : Window
    {
        public SubWindow()
        {
            InitializeComponent();
        }
    }
}
ファイル名:SubWindowViewModel.cs
using System.ComponentModel;
using Reactive.Bindings;
using System.Windows;
using System;

namespace WpfSample20SubWindow
{
    public class SubWindowViewModel : INotifyPropertyChanged
    {
        public event PropertyChangedEventHandler PropertyChanged;
        protected virtual void OnPropertyChanged(string name) => PropertyChanged(this, new PropertyChangedEventArgs(name));

        public ReactiveProperty<string> Field { get; private set; } = new ReactiveProperty<string>();
        public SubWindowViewModel()
        {
            PropertyChanged += (o, e) => {};
        }
    }
}
使い方
起動します。
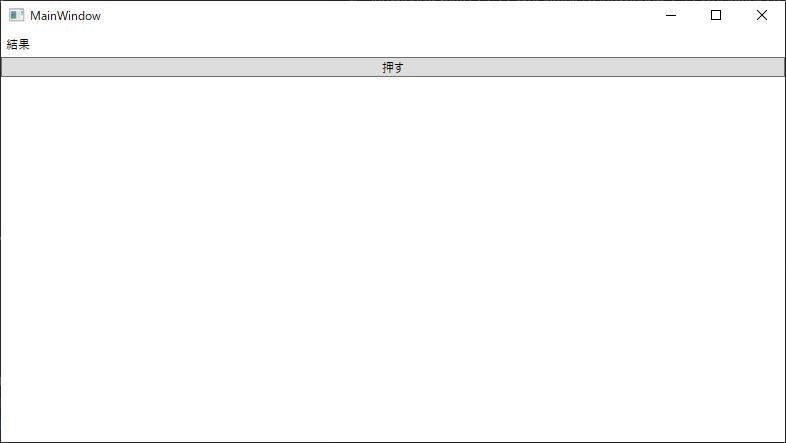
「押す」ボタンを押すと別ウィンドウが表示されます。

別ウィンドウ内のテキストボックスに文字を入力しウィンドウを閉じます。
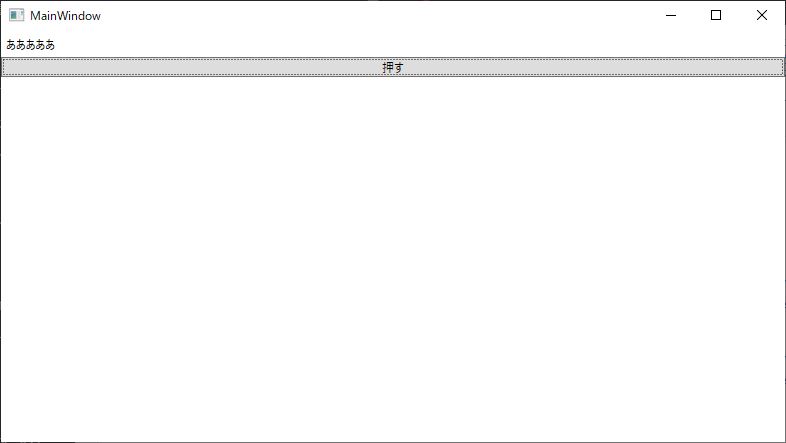
当初「結果」と表示されていたラベルの内容がサブウィンドウで入力した内容に置き換わります。
言い訳
別ウィンドウで入力したテキストボックスの値をメインウィンドウのViewModelで取得する方法が、これでいいのか大分怪しいですが、思った通りの振る舞いにはなりました。
アプリケーション内の入力項目が多くなる場合を想定して別ウィンドウの作り方を学びましたが、SubWindowようにXAMLを書いてViewModelを書いてなどなど、MainWindowで必要となるファイルを一式用意する必要がありました。考えてみれば当たり前かもしれませんが意外と面倒に感じました。
メインウィンドウ内のコントロールの可視、不可視の切り替えやTabやExpanderなどのコントロールをうまく使うとMainWindowだけでも複雑な入力フォームや画面遷移のようなものが作れそうな気がしますので、そちらの方法を試してみたいと思います。
アプリケーション内の入力項目が多くなる場合を想定して別ウィンドウの作り方を学びましたが、SubWindowようにXAMLを書いてViewModelを書いてなどなど、MainWindowで必要となるファイルを一式用意する必要がありました。考えてみれば当たり前かもしれませんが意外と面倒に感じました。
メインウィンドウ内のコントロールの可視、不可視の切り替えやTabやExpanderなどのコントロールをうまく使うとMainWindowだけでも複雑な入力フォームや画面遷移のようなものが作れそうな気がしますので、そちらの方法を試してみたいと思います。

コメント